It's that time of year for our monthly 'shoebox' group to think about the 2014 flip calendar. Each of us takes 2 months of the year and creates 12 pages of each month. My month's are November and December. I had to complete my pages early and that is why they are shown here without the calendar sheet attached.
For November I used a cuttlebug embossing folder and a cuttlebug die to create the pumpkin theme. The 2 acorns in the right bottom corner are made of felt and I found them at a craft store. I typed the 'give thanks' and printed on card stock.
For December I used a set of clear stamps from Close to My Heart to create the snowman including his hat and arms. I used a cuttlebug embossing folder to create the snowflake background. And on the bottom of the page I tore a piece of Ice Silver Text paper (Curious Metallics from The Paper Cut) and then brushed on some glitter glue to add to the sparkle.
It's time for a change; it's time to grow. This blog is one step that will encourage me to explore, experiment, and share my journey. But the primary element in my growth is the inspiration of my talented friends.
Showing posts with label calendars. Show all posts
Thursday, October 3, 2013
Saturday, August 3, 2013
Calendars for 2014
It may only be August, but the sooner I get the 2014 calendars finished the better. Since the summer weather hasn't been so great this year I have more time to craft indoors.
I created 49 calendars in total and here are pics of the various styles that I made. I think I would get too bored making all of them the same. And besides.... this way my friends have a choice.
I used the Tim Holtz clock die for this group along with a sentiment from one of Tim's Stamper's Anonymous stamp sets.
In this group of calendars I like the extra pizzazz that the punched border gives. I'll have to remember that for other projects and cards. It is also a great way to use up pieces of scrap paper.
The saying is from a set of Birthday sentiments made by Fiskars.
The paper is from a 6 x 6" Bo Bunnie paper pad. I had a difficult time parting with it... but I don't know why I was hanging on to it anyway. I need to use up more of my stuff!!!
I was using some of my ribbons before I had the idea to use my punches to create an embellished border.
I wanted to make some calendars that did not have a clock or time theme. I used a brass stencil and momento inks to color the cattails on the decorative scrapbook paper. I had a bunch of die cut butterflies in my stash so I used them also. The sentiment is from Sweet Pea Stamps.
I just love this frog; I have used this stamp so much (Sparkle N Sprinkle). I like to stamp it in black and color with Twinkling H2O's. The sentiment is a $1 from Michael's.
I was attempting to use up some of my wide ribbon and found several pieces that worked well with the colors of the paper I was using.
I used my oval spellbinders to cut the frog and the mats that I used with him.
I created 49 calendars in total and here are pics of the various styles that I made. I think I would get too bored making all of them the same. And besides.... this way my friends have a choice.
I used the Tim Holtz clock die for this group along with a sentiment from one of Tim's Stamper's Anonymous stamp sets.
In this group of calendars I like the extra pizzazz that the punched border gives. I'll have to remember that for other projects and cards. It is also a great way to use up pieces of scrap paper.
The saying is from a set of Birthday sentiments made by Fiskars.
The paper is from a 6 x 6" Bo Bunnie paper pad. I had a difficult time parting with it... but I don't know why I was hanging on to it anyway. I need to use up more of my stuff!!!
I was using some of my ribbons before I had the idea to use my punches to create an embellished border.
I wanted to make some calendars that did not have a clock or time theme. I used a brass stencil and momento inks to color the cattails on the decorative scrapbook paper. I had a bunch of die cut butterflies in my stash so I used them also. The sentiment is from Sweet Pea Stamps.
I just love this frog; I have used this stamp so much (Sparkle N Sprinkle). I like to stamp it in black and color with Twinkling H2O's. The sentiment is a $1 from Michael's.
I was attempting to use up some of my wide ribbon and found several pieces that worked well with the colors of the paper I was using.
I used my oval spellbinders to cut the frog and the mats that I used with him.
Wednesday, October 3, 2012
2013 Calendars.... continued
I'm finished with my 2013 calendars!!! Hurray!!!
It was fun. I have several stamps that are motivational type phrases and I wanted to use them on this year's calendars.
I still had a bunch of these cute little drink umbrellas and they seemed the perfect addition for this phrase.
I love this saying... what am I saying... I love all the phrases I used on these calendars!!!
I have a lot of decorative papers, and this sheet from a BoBunny pack was a good choice with the Tim Holtz man and umbrella stamp. Is there a theme going on here with my calendars??? I just realized I have another umbrella in this set of calendars!!
Here is that same phrase and the umbrella man, but on a different sheet from the BoBunny pack. I used one of my newest purchases on this set of calendars. It is up there in the top left corner and it is called mica fragments. The color is tea stained; it comes in several colors, and it is from Stampendous. I attached the flakes with a little dab of glue. At the rate I'm using these flakes they'll last me forever... with half the jar leftover.
I bought this stamp some time ago... like years. I don't know if I ever used it until today. I ran the background piece through the Cuttlebug using the Roman Bath embossing folder. The paper is 'So...Jeans Blue' and I purchased it from The Paper Cut. After running the piece through the Cuttlebug I used a piece of sandpaper so that some of the white core came through.
This calendar is using the same stamp and paper as the one shown above. The difference being that I used the 'Retro Squares' embossing folder.
These colorful papers were in my large folder containing scraps. But the scraps were large enough to accommodate the sizes I needed for the calendar. I added a little ric rack where the 2 different papers met. I must know someone who will like these bright colors!
Here again is a piece of 'scrap' paper I had in my stash that was big enough to use for a calendar. I love using up items that I've been saving!
This one may make your eyes go crazy, but I do like those colors.
Sticking with the theme of time/clocks like the first couple sets of calendars I made, I came up with this design. I like the fact that this stamp fit inside one of the spellbinders dies that I have.
The 'Stars' embossing folder was the perfect match with this stamp. One of my most used tools is my Gelly Roll 'clear star' gel pen. It really makes those embossed stars pop!!!
Well, that should do it for 2013 calendars!!!
It was fun. I have several stamps that are motivational type phrases and I wanted to use them on this year's calendars.
I still had a bunch of these cute little drink umbrellas and they seemed the perfect addition for this phrase.
I love this saying... what am I saying... I love all the phrases I used on these calendars!!!
I have a lot of decorative papers, and this sheet from a BoBunny pack was a good choice with the Tim Holtz man and umbrella stamp. Is there a theme going on here with my calendars??? I just realized I have another umbrella in this set of calendars!!
Here is that same phrase and the umbrella man, but on a different sheet from the BoBunny pack. I used one of my newest purchases on this set of calendars. It is up there in the top left corner and it is called mica fragments. The color is tea stained; it comes in several colors, and it is from Stampendous. I attached the flakes with a little dab of glue. At the rate I'm using these flakes they'll last me forever... with half the jar leftover.
I bought this stamp some time ago... like years. I don't know if I ever used it until today. I ran the background piece through the Cuttlebug using the Roman Bath embossing folder. The paper is 'So...Jeans Blue' and I purchased it from The Paper Cut. After running the piece through the Cuttlebug I used a piece of sandpaper so that some of the white core came through.
This calendar is using the same stamp and paper as the one shown above. The difference being that I used the 'Retro Squares' embossing folder.
These colorful papers were in my large folder containing scraps. But the scraps were large enough to accommodate the sizes I needed for the calendar. I added a little ric rack where the 2 different papers met. I must know someone who will like these bright colors!
Here again is a piece of 'scrap' paper I had in my stash that was big enough to use for a calendar. I love using up items that I've been saving!
This one may make your eyes go crazy, but I do like those colors.
Sticking with the theme of time/clocks like the first couple sets of calendars I made, I came up with this design. I like the fact that this stamp fit inside one of the spellbinders dies that I have.
The 'Stars' embossing folder was the perfect match with this stamp. One of my most used tools is my Gelly Roll 'clear star' gel pen. It really makes those embossed stars pop!!!
Well, that should do it for 2013 calendars!!!
Monday, September 17, 2012
2013 Calendars
I'm running out of TIME!!!! I know it is only September, but I need to get my 2013 calendars finished soon!
I recently purchased a set of stamps at a rummage sale at my local stamp store. Those stamps seemed perfect to use for some of the 2013 calendars I am in the process of creating.
All 4 stamps used on this and the next calendar shown came from that set.
I used spellbinders dies to cut out the sentiment and an additional layer of card stock to mount it on.
After making 4 calendars with the purple card stock I decided to make another 4 using beige and green. I did use a different sentiment on the beige calendars.
I used some sparkling embossing powder on the word 'Time' when I stamped it. And I used my gel glitter pen to highlight parts of the stamped clock in the lower left corner.
For the next set of calendars I used a sizzix embossing folder, of clocks naturally, to emboss the background.
The sentiment I used is one of Tim Holtz's stamps. I love the sentiment and wanted to use some of my 'inspirational' type stamps on this year's batch of calendars.
I used my gel glitter pen again to highlight the hands on one of the embossed clocks.
I used the sponge applicator tool to add some shading to the sentiment after it was cut out with a spellbinders die.
And just as I had with my previous design... I created 4 calendars using one color (purple) and then created 4 more in a different color scheme... orange.
I recently purchased a set of stamps at a rummage sale at my local stamp store. Those stamps seemed perfect to use for some of the 2013 calendars I am in the process of creating.
All 4 stamps used on this and the next calendar shown came from that set.
I used spellbinders dies to cut out the sentiment and an additional layer of card stock to mount it on.
After making 4 calendars with the purple card stock I decided to make another 4 using beige and green. I did use a different sentiment on the beige calendars.
I used some sparkling embossing powder on the word 'Time' when I stamped it. And I used my gel glitter pen to highlight parts of the stamped clock in the lower left corner.
For the next set of calendars I used a sizzix embossing folder, of clocks naturally, to emboss the background.
The sentiment I used is one of Tim Holtz's stamps. I love the sentiment and wanted to use some of my 'inspirational' type stamps on this year's batch of calendars.
I used my gel glitter pen again to highlight the hands on one of the embossed clocks.
I used the sponge applicator tool to add some shading to the sentiment after it was cut out with a spellbinders die.
And just as I had with my previous design... I created 4 calendars using one color (purple) and then created 4 more in a different color scheme... orange.
Tuesday, September 20, 2011
Calendar project - April
Here is my page for the month of April; I've already completed my pages for the month of August.
I started with a light green heavy weight card stock. After cutting the pages to size I stamped the flower stems in meadow, the clouds in london fog, and the rain drops in stormy sky. Next I cut a strip of decorative scrapbook paper for the bottom, trimming the top edge with decorative scissors, and then attached that to the bottom of the page. I mounted the April calendar onto green card stock and attached to the upper right corner.
I took a little 'cocktail' umbrella, opened it up, flattened it somewhat, and then taped it down to the page.... after all, it is April showers.
I used gel pens to color buds onto the flower stems. I used glossy accents to add a little dimension and sparkle to the rain drops. And, I used diamond glaze under the umbrella to help adhere the stick to the page.
I like the result and I hope everyone else in our monthly stamp group will like the month of April also.
Monday, September 12, 2011
Desk Calendar
I ran a piece of card stock through the cuttlebug with the 'numbers' embossing folder for the background. I edged the piece with a gold krylon pen before attaching to the easel.
I used a nestabilities clock die to cut out the clock and before removing the piece from the die I used a sponge with black ink to color the roman numerals on the face of the clock. I shaded the outer edge of the clock with distress ink and then attached clock hands with a brad. The wings were stamped on a gold card stock, cut out, and attached to the back of the clock. I used dimensional tape when attaching the clock to the background. Before attaching the calendar, I first cut a piece of black card stock a little larger so that the calendar would stand out from the background paper.
Calendar project - August
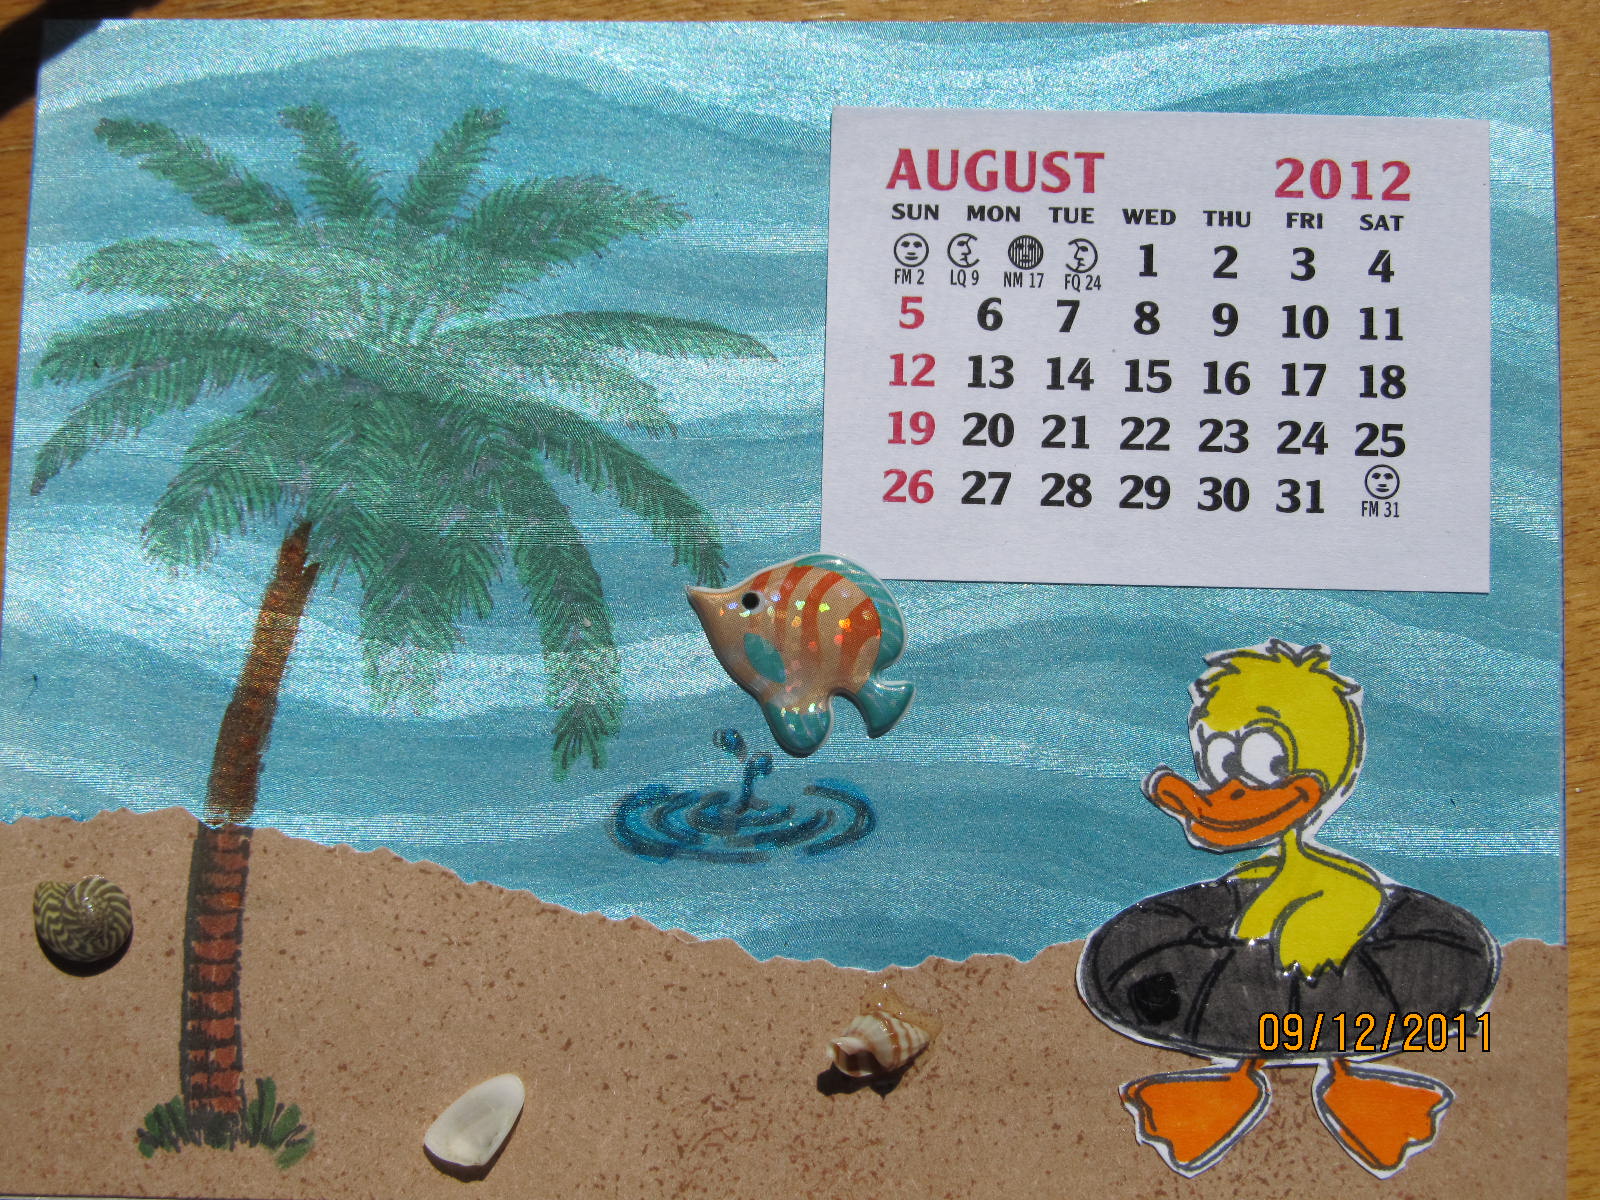
Here is my page for the month of August.
I used a piece of specialty paper I purchased from The Paper Cut. It appears to have waves so it is perfect for coloring blue and pretending it is the ocean! I cut a strip of brown paper with decorative scissors for the sand and attached small shells with diamond glaze. The palm tree is stamped and then colored with markers. The duck in the inner tube was stamped on a separate piece of card stock, colored with markers, cut out, and run through a xyron sticker maker. Before attaching him to the page I applied diamond glaze on the inner tube for dimension. The fish jumping out of the ocean is a sticker and the little splash image is a stamp from the same 'Close to my Heart' set that the duck is from. I hope everyone likes their August page.
Subscribe to:
Posts (Atom)