My friend Maggi gave me a spellbinders die called 'Cattails' in December. It is a wonderful die, but a little bit of a pain in the neck to use. The piece has some very fine/narrow stems that are tricky to cut and then release from the die. I found that using wax paper along with the paper being die cut helps... also running the die through my cuttlebug multiple times makes it easier to get a clean cut and a good release.
So, as long as I was getting good results I decided to cut several of the die... and rather than put the pieces aside and doing something at a later date I jumped right in and created some cards with the die cuts.
I did sponge on some light beige to brown inks after I removed the papers from the die.
For some cards I used embossing folders on the layer beneath the die to create texture. For other cards I used decorative scrapbook papers.
I have quite a few word/phrase stamps that I've been intending to put to use... what better time than now.
I'm happy with the batch of cards I can now add to my stash. And I used up all the die cuts... maybe I should create more.
It's time for a change; it's time to grow. This blog is one step that will encourage me to explore, experiment, and share my journey. But the primary element in my growth is the inspiration of my talented friends.
Sunday, January 27, 2013
Gift purse with matching cards
I learned of this project a couple of years ago when a group of my crafty friends spent a weekend sharing ideas. You start with 2 - 12 x 12" sheets of double sided scrapbook paper. Most of 1 sheet is used to create the 'purse', and the leftovers of that sheet along with the other sheet are used to create as many cards as possible that match the purse.
The sheets I used were striped on one side and had a flower design on the other. This is a side view of the purse with the cards inside. The purse is made up of 4 pieces of the paper.... body, top flap, and 2 side panels.
I used a decorative edge punch on the front flap. And I use eyelets in the top flat and some white cord to create the handle.
I used the striped side of the paper to create this 'cabin-themed' card. I added some dark brown and red card stock that matched well with the colors in the stripes. I ran the red card through the cuttlebug with the 'distressed stripes' embossing folder. Spellbinders oval dies were used to cut the stamped image and the red and brown layers. The copper tree brads were added to the bottom corners.
On this card I used the floral side of the paper. This side of the paper allowed me to work with an entirely different color palette. I stamped flourishes on the yellow background and attached a fabric flower created with 4 pieces and a gem brad. The word stamp is from 'Dylusions' (Ranger). I stamped and cut out with spellbinders dies adding the gems in the corners of the orange layer.
This card also used the floral side of the paper. The bloom stamp, a $1 purchase, was layered on brown and orange pieces cut from Spellbinders dies. My Momento 'Ruhbarb Stalk' ink seemed a perfect match in this color scheme. I used it to stamp the flower on the yellow layer. Three types of fiber were tied around the top layers to add interest.
I used the stripes side of the paper for this 'coffee-themed' card. The coffee cup was stamped and cut with a Spellbinders die as well as the blue and brown layers that it was attached to. The blue ribbon and brads were attached before the coffee cup image. The saying was stamped on an off white paper and cut into a rectangle, and then layered onto brown and blue.
Everyone can use a birthday card. This one is very bright and cheery with the red and blue colors. The medallion under the birthday stamp is cut from the striped paper using a spellbinders die. A couple of square red brads add a little interest.
Back to the floral side... The floral piece was passed through the cuttlebug with a floral embossing folder to add some dimension. I'm not sure if I achieved the look I was expecting, but it's okay. I stamped the flower on pink card stock by applying my markers directly to the stamp and then lightly misting the stamp with water. I love the watercolor look it creates. The words were stamped in pink and cut with a spellbinders die. The pink ribbon with brown polka dots was attached to create a border between the pink and floral card. I used a marker to draw the dots and squiggles around the right side of the card.
Red and pink made this floral themed card very bright. The pink and red floral pieces are cut with cuttlebug dies, and a rhinestone-like embellishment is attached to the center of each with a glue dot. The green leafy branch is a sizzix die. The red layer was passed through the cuttlebug with a floral embossing folder before attaching to the pink card and adding the striped piece to the top.
I think this is my favorite card. I love the pink and olive green. The bicycle was stamped on white, cut with a spellbinders oval and layered onto an olive green scalloped oval. I ran the pink layer through the cuttlebug with the dots and spots embossing folder. And I found some pink and green ribbon in my bag of ribbon that was the perfect finishing touch.
Now, I will take 6 of these 8 cards and put them into the purse... which should I choose???
The sheets I used were striped on one side and had a flower design on the other. This is a side view of the purse with the cards inside. The purse is made up of 4 pieces of the paper.... body, top flap, and 2 side panels.
I used a decorative edge punch on the front flap. And I use eyelets in the top flat and some white cord to create the handle.
I used the striped side of the paper to create this 'cabin-themed' card. I added some dark brown and red card stock that matched well with the colors in the stripes. I ran the red card through the cuttlebug with the 'distressed stripes' embossing folder. Spellbinders oval dies were used to cut the stamped image and the red and brown layers. The copper tree brads were added to the bottom corners.
On this card I used the floral side of the paper. This side of the paper allowed me to work with an entirely different color palette. I stamped flourishes on the yellow background and attached a fabric flower created with 4 pieces and a gem brad. The word stamp is from 'Dylusions' (Ranger). I stamped and cut out with spellbinders dies adding the gems in the corners of the orange layer.
This card also used the floral side of the paper. The bloom stamp, a $1 purchase, was layered on brown and orange pieces cut from Spellbinders dies. My Momento 'Ruhbarb Stalk' ink seemed a perfect match in this color scheme. I used it to stamp the flower on the yellow layer. Three types of fiber were tied around the top layers to add interest.
I used the stripes side of the paper for this 'coffee-themed' card. The coffee cup was stamped and cut with a Spellbinders die as well as the blue and brown layers that it was attached to. The blue ribbon and brads were attached before the coffee cup image. The saying was stamped on an off white paper and cut into a rectangle, and then layered onto brown and blue.
Everyone can use a birthday card. This one is very bright and cheery with the red and blue colors. The medallion under the birthday stamp is cut from the striped paper using a spellbinders die. A couple of square red brads add a little interest.
Back to the floral side... The floral piece was passed through the cuttlebug with a floral embossing folder to add some dimension. I'm not sure if I achieved the look I was expecting, but it's okay. I stamped the flower on pink card stock by applying my markers directly to the stamp and then lightly misting the stamp with water. I love the watercolor look it creates. The words were stamped in pink and cut with a spellbinders die. The pink ribbon with brown polka dots was attached to create a border between the pink and floral card. I used a marker to draw the dots and squiggles around the right side of the card.
Red and pink made this floral themed card very bright. The pink and red floral pieces are cut with cuttlebug dies, and a rhinestone-like embellishment is attached to the center of each with a glue dot. The green leafy branch is a sizzix die. The red layer was passed through the cuttlebug with a floral embossing folder before attaching to the pink card and adding the striped piece to the top.
I think this is my favorite card. I love the pink and olive green. The bicycle was stamped on white, cut with a spellbinders oval and layered onto an olive green scalloped oval. I ran the pink layer through the cuttlebug with the dots and spots embossing folder. And I found some pink and green ribbon in my bag of ribbon that was the perfect finishing touch.
Now, I will take 6 of these 8 cards and put them into the purse... which should I choose???
Saturday, January 5, 2013
Baby Carriage Card
I was looking through my friend, Bonnie's, blog today and was inspired. I commented that this was a card I was going to make. Well, why wait!!! I might not get to it if I put it off. And, since I'll be needing a card like this for the 'soon to be born' great grandson why not get it done now!!!
Here is a link to Bonnie's blog for this card...
http://craftiblog.wordpress.com/2012/12/31/2012-12-31-welcome-baby-new-year/
Here are the pieces for my card. I did use a cuttlebug folder on the front piece of the carriage since I was using core'dinations paper and planned to sand it down.
Bonnie mentioned that you needed to experiment with the size of the piece used for the carriage awning. My piece was 2 1/2" wide by 9" long, and I scored it at every 1/4". After sanding the cuttlebug'd area I attached the awning using plenty of fabric tack. I did use some double sided tape to adhere the bottom edge before gluing and some on the other edge after gluing. This step needs to be done prior to attaching the front piece to the card.
Hold down the awning and let the glue take hold before moving on to the next step.
I had cut a strip of decorative scrapbook paper from the same sheet I used for the awning. I used the same border punch (Martha Stewart) on that strip as I had on the top of the awning. I attached that with some double sided tape.
Then, just as Bonnie did, I used a brad, mine is a star shaped brad, and some ribbon and attached it in the corner before taping the front piece onto the card.
And the final touch... I attached the small circles to the front and back of the card and then attached buttons to all 4 circles/wheels. Baby Nolan may not appreciate the card, but I know that Mom, Lizzy, and Grandma, Tammy, will!!! Thank you Bonnie!!!!
Wednesday, November 7, 2012
Art and Soul Configuration Box
I've finished the Art and Soul configuration box that we started at Jan's house during our WI Art Camp in October. Here is a look at the entire project. It will be fun to see everyone else's box. I had various ideas for how to finish this project and even started looking at the craft stores for things to use. BUT... then I decided to use items I already had on hand. I've been trying to use up things I've had so why not in the case of this project!!
It is amazing what a person can accumulate over the span of several years. All the items I added were so small that it didn't even make a dent in my stash.
However, I really enjoyed this project and could see doing more of them in the future.
Here is a closer look at the embellishments hanging off the right side of the box. The only item I added since leaving Jan's is the shrink plastic torso. There are some beads, one being a die, attached to the stamped shrink plastic torso using red artistic wire. Would you believe this is a left over charm that I made years ago as a swap item for the Raeven's Nest retreat in Cedarburg... where the Bev, Carol, and Margaret met us face to face for the first time!!! I guess this charm was meant to be part of this project class that we took together.
In the lower right corner is a small rectangular box. This one gave me a bit of a problem. I tried out one idea and ripped it out. Then I strung colored beads and a gear charm onto artistic wire. I pushed one end of each string into a small hole in the sides of the box and secured with some diamond glaze. Then I found some silver fan charms and attached it to the corner of the box with diamond glaze and then added a pearl embellishment.
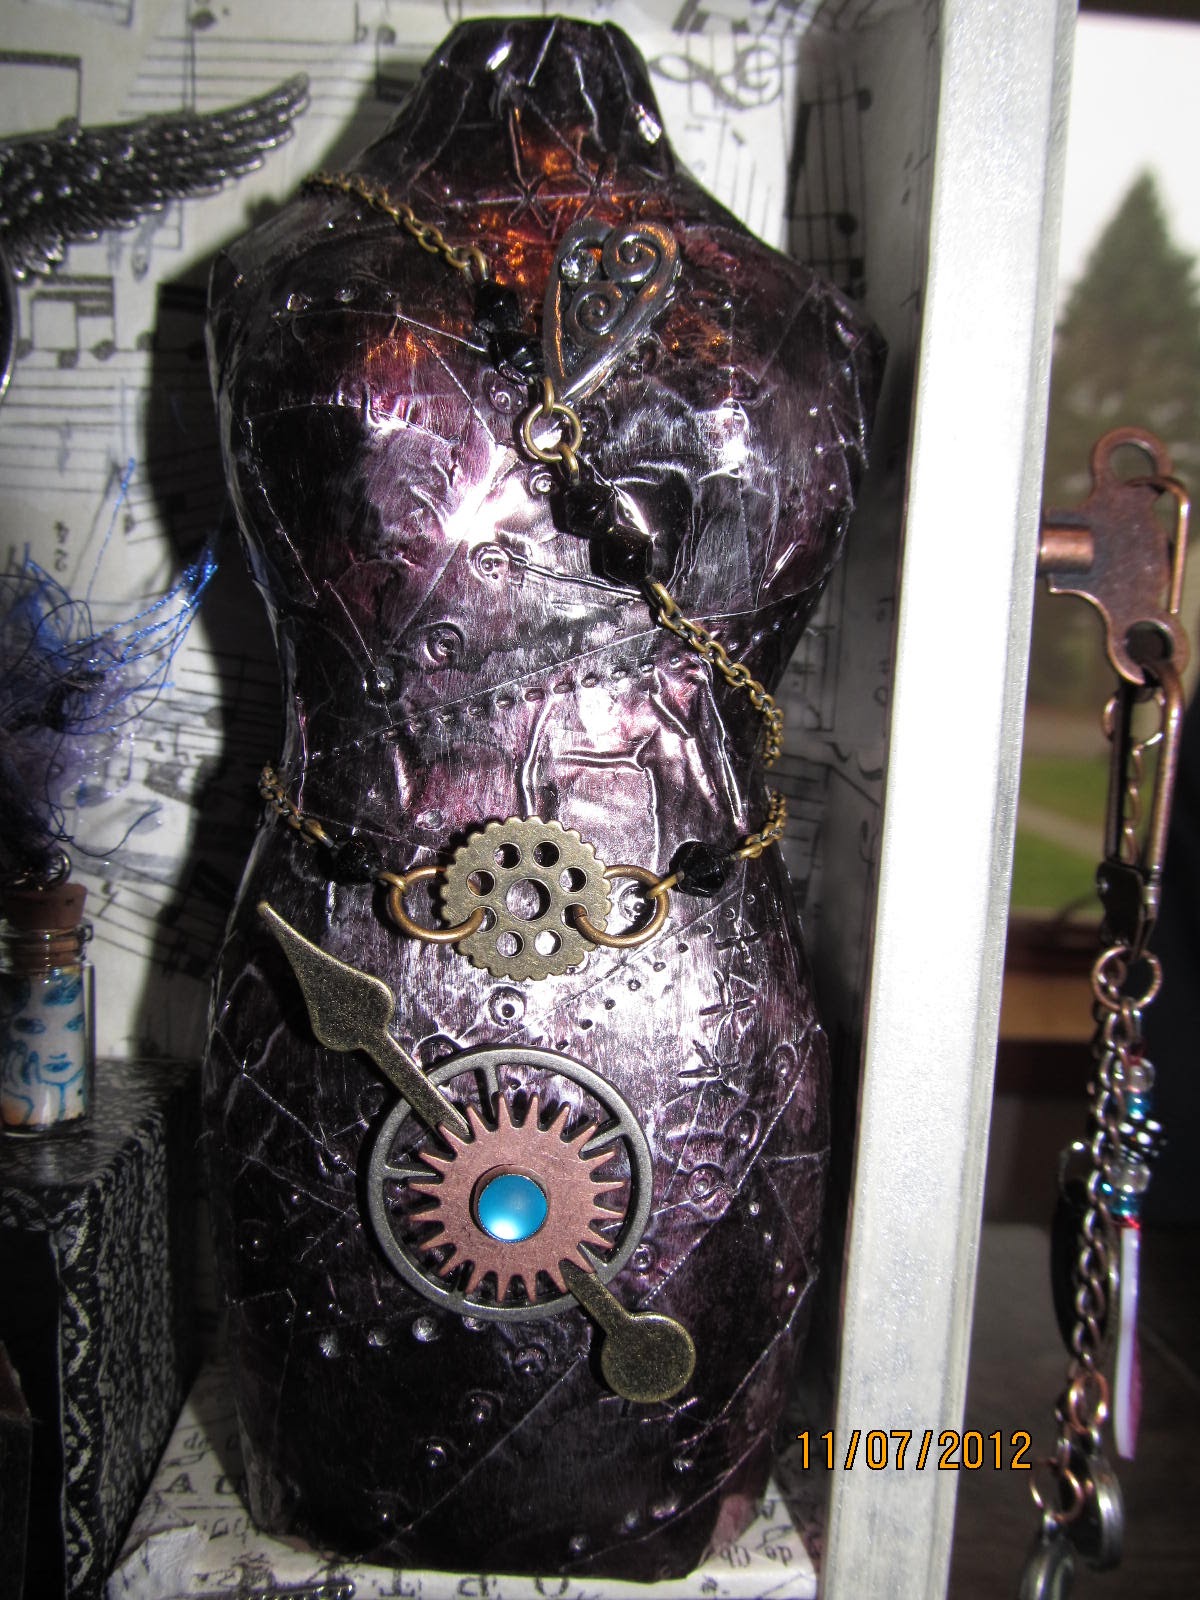
Standing on the small rectangular box is the torso. I found a beaded chain, that I think I pulled off some other project, and wrapped it around the torso securing with stick pins and diamond glaze. I added a gear charm in the chain at the torso's waist. I had a package of jewelry heart charms so I chose the silver one and attached to the chest of the torso with diamond glaze. Jan had given us some embellishments to use as we chose so I took a couple of the gears and a large spinner, secured them together with a colored brad and used liquid nails to attach to the torso.
In the lower right I had placed a square box. I found a metal 'castle' and 2 copper star charms that someone had given me in my stash. I used a piece of thick cardboard to attach and prop the castle up with and placed one star so that it hung in the opening of the castle. The other star was attached using a black brad into the side of the box. I used another fan charm in the corner of this box using red line tape and diamond glaze to secure.
I placed a small square box on top of the larger box, but before doing that, I used red line tape to attach decorative trim to all four sides on the front of the box. Using a small piece of artistic wire I hung a decorative metal piece from the top of the box. I had 4 of these metal pieces and can't remember who I got them from, but I've had them for years. To the right of the box I attached a small bottle that Carol had made. I think it was from some charm swap that we did years ago on CCSwaps.
Just above the small square box and to the left of the torso I used the clock face, angel wing, and spinners that Jan had provided with this project. I used another one of my 'gem brads' to secure the hands to the clock face and then used red line tape and dimensional tape to secure the items to the back of the box.
On top of the box I added 2 more of the metal embellishments like the one I had used inside the small square box. I used liquid nails to secure them to the light bulb.
This project was so much fun. Thanks Jan, for having this class for us. It opened my eyes to a lot more project ideas... now all I have to do is execute them!!!
It is amazing what a person can accumulate over the span of several years. All the items I added were so small that it didn't even make a dent in my stash.
However, I really enjoyed this project and could see doing more of them in the future.
Here is a closer look at the embellishments hanging off the right side of the box. The only item I added since leaving Jan's is the shrink plastic torso. There are some beads, one being a die, attached to the stamped shrink plastic torso using red artistic wire. Would you believe this is a left over charm that I made years ago as a swap item for the Raeven's Nest retreat in Cedarburg... where the Bev, Carol, and Margaret met us face to face for the first time!!! I guess this charm was meant to be part of this project class that we took together.
In the lower right corner is a small rectangular box. This one gave me a bit of a problem. I tried out one idea and ripped it out. Then I strung colored beads and a gear charm onto artistic wire. I pushed one end of each string into a small hole in the sides of the box and secured with some diamond glaze. Then I found some silver fan charms and attached it to the corner of the box with diamond glaze and then added a pearl embellishment.
Standing on the small rectangular box is the torso. I found a beaded chain, that I think I pulled off some other project, and wrapped it around the torso securing with stick pins and diamond glaze. I added a gear charm in the chain at the torso's waist. I had a package of jewelry heart charms so I chose the silver one and attached to the chest of the torso with diamond glaze. Jan had given us some embellishments to use as we chose so I took a couple of the gears and a large spinner, secured them together with a colored brad and used liquid nails to attach to the torso.
In the lower right I had placed a square box. I found a metal 'castle' and 2 copper star charms that someone had given me in my stash. I used a piece of thick cardboard to attach and prop the castle up with and placed one star so that it hung in the opening of the castle. The other star was attached using a black brad into the side of the box. I used another fan charm in the corner of this box using red line tape and diamond glaze to secure.
I placed a small square box on top of the larger box, but before doing that, I used red line tape to attach decorative trim to all four sides on the front of the box. Using a small piece of artistic wire I hung a decorative metal piece from the top of the box. I had 4 of these metal pieces and can't remember who I got them from, but I've had them for years. To the right of the box I attached a small bottle that Carol had made. I think it was from some charm swap that we did years ago on CCSwaps.
Just above the small square box and to the left of the torso I used the clock face, angel wing, and spinners that Jan had provided with this project. I used another one of my 'gem brads' to secure the hands to the clock face and then used red line tape and dimensional tape to secure the items to the back of the box.
On top of the box I added 2 more of the metal embellishments like the one I had used inside the small square box. I used liquid nails to secure them to the light bulb.
This project was so much fun. Thanks Jan, for having this class for us. It opened my eyes to a lot more project ideas... now all I have to do is execute them!!!
Labels:
Altered boxes,
art retreat,
Classes taken,
creative art camp
Altered Apron
I'm finished!!! Here is a shot of my altered apron that was started during our WI Art Camp in October. The only thing I added since the art camp are the 2 TAP transfers of our art camp group. Here is a run down of who did what to my apron; I'll start at the top and work my way down the apron from left to right...
- Maggi created a small pin using friendly plastic we played with during our art camp. It is in the upper left corner of my apron.
- Jan drew the artistic letter 'C' in the top center.
- Pea created the friendly plastic black and white checkered heart that is velcroed onto the apron just below the 'C'.
- I added the pic of Molly that had placed on a TAP transfer.
- I added the small butterfly transfer on the left side.
- And there is the TAP transfer that Margaret sent to all of us. It is a pic of all of us in our altered aprons.
- Carol drew the butterfly on the right side using fabric markers.
- Margaret applied glittery paint over a flowered stencil and then added gems in the center of some of the flowers.
- Pea stenciled the letters 'W', 'A', and 'C' for WI Art Camp. I added the other letters using scribbles fabric paint.
- I added the smaller TAP transfer of our artsy group that Margaret also sent to us next to Pea's WAC.
- I drew the fish using the scribbles fabric paint.
- Bev hand embroidered the word 'create' onto a piece of burlap fabric and then added a decorative button and flower before attaching to the apron using french knots. I'll bet she thought she'd never finish.
- Mary had stamped an image onto a piece of muslin and added some color prior to art camp. Then she sewed it onto the apron pocket.
Needless to say... I don't think any of us will wash these aprons and take the chance of losing all the wonderful artwork. It was a fun project and I think everyone enjoyed it.
- Maggi created a small pin using friendly plastic we played with during our art camp. It is in the upper left corner of my apron.
- Jan drew the artistic letter 'C' in the top center.
- Pea created the friendly plastic black and white checkered heart that is velcroed onto the apron just below the 'C'.
- I added the pic of Molly that had placed on a TAP transfer.
- I added the small butterfly transfer on the left side.
- And there is the TAP transfer that Margaret sent to all of us. It is a pic of all of us in our altered aprons.
- Carol drew the butterfly on the right side using fabric markers.
- Margaret applied glittery paint over a flowered stencil and then added gems in the center of some of the flowers.
- Pea stenciled the letters 'W', 'A', and 'C' for WI Art Camp. I added the other letters using scribbles fabric paint.
- I added the smaller TAP transfer of our artsy group that Margaret also sent to us next to Pea's WAC.
- I drew the fish using the scribbles fabric paint.
- Bev hand embroidered the word 'create' onto a piece of burlap fabric and then added a decorative button and flower before attaching to the apron using french knots. I'll bet she thought she'd never finish.
- Mary had stamped an image onto a piece of muslin and added some color prior to art camp. Then she sewed it onto the apron pocket.
Needless to say... I don't think any of us will wash these aprons and take the chance of losing all the wonderful artwork. It was a fun project and I think everyone enjoyed it.
Tuesday, October 30, 2012
WI Art Camp 2012 - Day 5
Our class is called Art and Soul and we're working with one of Tim's configuration boxes. The project was supposed to be Heart and Soul, but the hearts that Jan ordered didn't get to her in time so we substituted Mary's paper mache torsos. And as it turned out, I think we all liked using the torsos more than we would have liked the hearts!!!
Some things just happen for a reason!
On the way to Jan's house we met Pea at Artist and Display and did some 'damage'. The TAP paper that Margaret turned us on to, and the gelli plate that Jan demoed at my house were popular items!
And then it was on to Jan's for fun and more shopping!!!
We had printed instructions that Jan made for us and we began the project step by step. But like any project we all work at a different pace and Jan had great patience with us all. We started by punching holes in our box covers so we could install the wheels and various other embellishments.
Then we needed to paint our boxes. We had choice of acrylic paints, distress stains, and the new distress metallic stains. I chose the easiest... distress metallic stain.. and I only used one color since I don't trust my ability to blend colors.
We took a break for lunch and you just couldn't stop some of us from shopping.
And then it was back to work.
Jan's husband Carl got home from work and started working on our dinner... what a treat!
Poor Margaret.... There were so many of us that we had an overflow area since the rest of us took up the entire dining room table.
We all used decorative tissue paper to cover the inside of our main box... simply applying with glue or matte medium, I used matte medium.
Once we determine which of the smaller boxes we would use inside the main box we used paper tape and/or washi tape to cover the outside and inside of the boxes. Jan had a ton of choices for us... black, white, colors, patterned, etc.
This was the first time I had used the tapes and after a little practice with them I like them and would use them again.
Margaret took a different approach... I like it!!!
Rather than have her inside boxes with the openings facing out, she turned them around, painted them to match the outside of the box, and attached embellishments on them so they looked like drawers. How cool!!!
I think this is Pea's. And now we're almost ready to move on to adding embellishments to the box and then working on the torso. We added metal corners to the box cover, a 'skate' key to the side with embellishments hanging from it, a key to hang off the front, and a numbered plaque attached to the top.
We covered the torso with metal foil. But before we did that, Jan had us practice with flashing tape on a paper mache heart so that we could see how easy or difficult it would be to work on a curved surface.
We tore the metal tape in pieces and then applied to the entire torso. After smoothing it down we used various items to create texture... like a tracing wheel, a pen, a piercing tool, and a credit card. When we were satisfied with the texture we created we used alcohol inks to color the torso. After coloring the torso we used steel wool on the torso. You could rub as little or as much as you wanted.
Carol did something different with her torso... only part of it was covered with the metal tape and the other part was covered with a napkin.
This is my box to the right. I didn't rub my torso as much as everyone else. I noticed that the more you rub, the more color that comes off. I wanted my torso to have lots of color since there was so much white, black, and silver to my box.
If you notice on the bottom of the box there is a metal plate, and each of us needed to come up with a 6 or 7 letter word to punch with a dymo that we slipped inside the plate. My word is 'petite' and Pea's word is 'sweet p'... so appropriate. I think Margaret's word was 'armoire'.
I think this box is Bev's, but I'm not sure. We were all so busy I couldn't keep up with what everyone else was doing.
Maggi's box is on the right. She painted the insides of a couple of her small boxes instead of lining with the paper tape.
There would be more work to be done on our own. We did not finish the insides of our small boxes at Jan's ... that is to be completed at home. I'm glad because at this point I need to think about what I want to do with them.
And you can see on Margaret's below that our next steps were to embellish our torso with some of the items that Jan provided and to attach the slides across the top of the box.
The original project that Jan found on line showed using a circular slide from a viewfinder, but she couldn't find any of them.
Above is a picture of all 7 of our creations. Now, it is up to us to take them home and finish them. Hopefully we all remember to post pictures when we finish them. This project has given me more ideas for projects I can make as gifts. Thanks so much Jan!!!
Check out this grill!!!
Chef Carl is making us dinner... are we lucky or what??
Carl made chicken breasts stuffed with spinach and feta cheese, and if that wasn't enough, he also made pork tenderloins that were covered with coarse ground dijon mustard while they were cooked. It was all sooooo delicious!
We returned home from our wonderful day of crafting, shopping, and eating at Jan's and Bob had already started a bonfire for us. Too bad we were full from eating dinner... no one had room for s'mores! It was such a mild day and night that the fire was just enough warmth to keep us cozy. It was our last night before Bev, Carol, and Margaret flew away.
Another successful Art Camp!!! And yes, we are doing it again. We may squeeze a CA Art camp in there, but I think we're all wanting to come back to WI again in 2013. It works for me!!!
Labels:
Altered boxes,
art retreat,
Classes taken,
creative art camp,
friends
WI Art Camp 2012 - Day 3 Addition
I forgot something!!! Jan had to leave early, but the rest of us decided to tackle one of the melt pot techniques; however, instead of using the melt pot we used the griddle.
This technique involved using jewelry bezels and charms. You started by placing the bezel on a craft sheet on the hot griddle. First we sprinkled various colors of embossing powders into the bezels. The instructive utube video showed using ultra thick embossing powders, but we didn't have those so we just used the regular embossing powders. That may be the reason some of our colors ran together after we added the clear UTEE. I hadn't taken any pictures of all of us as we worked on this project so this picture is of the 2 bezels I had created.
After sprinkling the colored embossing powders lay charms inside the bezels and then sprinkle clear UTEE into the bezel. We found that adding too much UTEE resulted in your charms being completely covered and since the colored powders appeared to be mixing with the UTEE as it melted the charms would disappear!!! You needed a tweezers so you could grab the bezel and pull it off the griddle as soon as the UTEE melted. I like mine, but if I ever get some colored ultra thick powders I would try this again and see if the results are different.
This technique involved using jewelry bezels and charms. You started by placing the bezel on a craft sheet on the hot griddle. First we sprinkled various colors of embossing powders into the bezels. The instructive utube video showed using ultra thick embossing powders, but we didn't have those so we just used the regular embossing powders. That may be the reason some of our colors ran together after we added the clear UTEE. I hadn't taken any pictures of all of us as we worked on this project so this picture is of the 2 bezels I had created.
After sprinkling the colored embossing powders lay charms inside the bezels and then sprinkle clear UTEE into the bezel. We found that adding too much UTEE resulted in your charms being completely covered and since the colored powders appeared to be mixing with the UTEE as it melted the charms would disappear!!! You needed a tweezers so you could grab the bezel and pull it off the griddle as soon as the UTEE melted. I like mine, but if I ever get some colored ultra thick powders I would try this again and see if the results are different.
Subscribe to:
Posts (Atom)