WOW... it has been a long time since I posted anything to my blog. And it is not because I haven't been creating things. I've been working on cards mostly and sometimes I just think they may not be worth the time to take a picture and post to the blog. I think I'm wrong about that and should be posting more of my everyday stuff... so here we go.
This is a building block card. No, I didn't come up with this unique card fold ... I found it in on Split Coast Stampers website.
First, let me tell you that the heart shape filled with smaller hearts is a die cut. My friend Mary was over last weekend and brought her new dies for us to see and had die cut several of them using white cardstock for us to have. Mary also provided the multi-colored scrapbook paper that I used behind the heart die.
On the front of the blue card I placed strips of purple and orchid scraps that I had available, and before attaching them I ran them through the cuttlebug using 3 different cuttlebug embossing border folders.
Inside the card you can now see the 4 'blocks' that give the card its name. Using my scor-pal first to score the lines that will create the blocks, I then used a craft knife and a steel edge ruler to cut them. I did cut orchid pieces of card stock to cover each side of the 4 blocks before attaching the letters I die cut using a cuttlebug alphabet set. I stamped a couple of hearts, an arrow, and the word love that are from a Stampin Up stamp set I've had forever.
Here's another look at the card opened up from a different angle.
Here is a link to the Split Coast Stampers website so you can read their tutorial on this card if you wish..
http://www.splitcoaststampers.com/resources/tutorials/buildingblockcard/
It wasn't difficult to do... try it!
Before I attempted the card, I used a piece of plain white card stock to ensure I would understand the instructions for creating this card. I'll save that white card as a template to help me if/when I make another of these cards
And here is another picture of just the inside of the card. This style card would be great for a 'get well' card also since the number of letters fit well with the number of blocks on the inside of the card.
Chrissy's Creations
It's time for a change; it's time to grow. This blog is one step that will encourage me to explore, experiment, and share my journey. But the primary element in my growth is the inspiration of my talented friends.
Wednesday, February 12, 2014
Thursday, October 3, 2013
2014 Flip calendar project
It's that time of year for our monthly 'shoebox' group to think about the 2014 flip calendar. Each of us takes 2 months of the year and creates 12 pages of each month. My month's are November and December. I had to complete my pages early and that is why they are shown here without the calendar sheet attached.
For November I used a cuttlebug embossing folder and a cuttlebug die to create the pumpkin theme. The 2 acorns in the right bottom corner are made of felt and I found them at a craft store. I typed the 'give thanks' and printed on card stock.
For December I used a set of clear stamps from Close to My Heart to create the snowman including his hat and arms. I used a cuttlebug embossing folder to create the snowflake background. And on the bottom of the page I tore a piece of Ice Silver Text paper (Curious Metallics from The Paper Cut) and then brushed on some glitter glue to add to the sparkle.
Labels:
calendars,
die cuts,
friends,
Gifts for friends,
Monthly stamp group
Monday, August 26, 2013
Get well for a 'furry friend'
A friend of mine requested a special card. Their son's golden retriever, Gibson, will be having ACL surgery in the fall. So my friend asked if I would create a get well card for Gibson. She gave me a picture of Gibson to use, but I found some other pictures on the internet that worked well with my idea.
Gibson is a reddish golden retriever so these pictures worked perfect for the theme of my card. I did try finding pictures of a dog with its leg in a cast, but I didn't really like any that I found. I think this idea with the 'cone' is a much better one.
I hope my friend likes the card. If she doesn't I'll make her another and keep this one for myself. I'm sure I will be able to find a use for it since it isn't specific about what type of health issue the dog has.
I love challenges like this... and love making dog cards.
Saturday, August 3, 2013
Calendars for 2014
It may only be August, but the sooner I get the 2014 calendars finished the better. Since the summer weather hasn't been so great this year I have more time to craft indoors.
I created 49 calendars in total and here are pics of the various styles that I made. I think I would get too bored making all of them the same. And besides.... this way my friends have a choice.
I used the Tim Holtz clock die for this group along with a sentiment from one of Tim's Stamper's Anonymous stamp sets.
In this group of calendars I like the extra pizzazz that the punched border gives. I'll have to remember that for other projects and cards. It is also a great way to use up pieces of scrap paper.
The saying is from a set of Birthday sentiments made by Fiskars.
The paper is from a 6 x 6" Bo Bunnie paper pad. I had a difficult time parting with it... but I don't know why I was hanging on to it anyway. I need to use up more of my stuff!!!
I was using some of my ribbons before I had the idea to use my punches to create an embellished border.
I wanted to make some calendars that did not have a clock or time theme. I used a brass stencil and momento inks to color the cattails on the decorative scrapbook paper. I had a bunch of die cut butterflies in my stash so I used them also. The sentiment is from Sweet Pea Stamps.
I just love this frog; I have used this stamp so much (Sparkle N Sprinkle). I like to stamp it in black and color with Twinkling H2O's. The sentiment is a $1 from Michael's.
I was attempting to use up some of my wide ribbon and found several pieces that worked well with the colors of the paper I was using.
I used my oval spellbinders to cut the frog and the mats that I used with him.
Monday, July 29, 2013
Terri's book
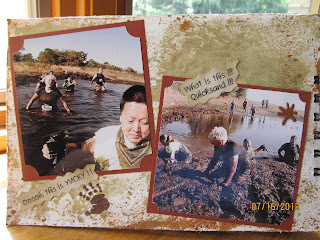
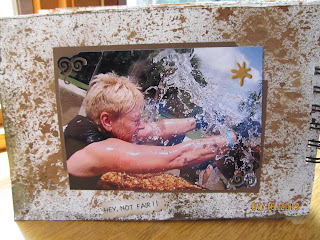
Terri came for a visit in July... and it was her birthday.. a BIG one!!! I wanted to do something special so I made this book. It contains pictures of most of the obstacle races that Terri ran with her friends in Florida.
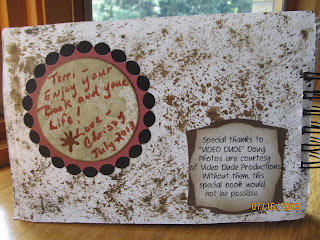
Before I explain more I have to give a GREAT BIG Thank You to Doug. Thanks to him I have these pictures. He ran these races with Terri and Kim and while doing that was taking video and pictures. Doug's business is called Video Dude Productions so all these pictures are copyright. I had to sign my life away at Walgreens when I had these photos printed.
I won't spend time writing a narrative for each page of this book... there are so many pages!!!
I created the pages using watercolor paper and several colors of walnut ink sprays. I wanted to achieve the look of mud since most, if not all, of these obstacle races involve walking, running, or crawling through mud at some point in the race.
I went online to find the logo for the various races that are included in Terri's book.
Once I organized the pictures I got the idea to create a caption for as many pictures as possible. There are very few that we, I had Bob help out, couldn't think of a caption.
I cut decorative corners in each of the pictures and mounted them on colored cardstock before gluing them into the book.
I typed the captions out on the computer, printed on paper, cut out with decorative scissors, and then applied some brown ink around the edges before gluing them in the book.
I looked through my stash of embellishments and through my stamps and found some of each that would work well with the theme of this book.
So that's about all I can tell you about the book. I hope you enjoy looking at the pictures.
Subscribe to:
Comments (Atom)


