Sunday, September 26, 2010

Purses... to hold cards

I have to thank my friend Maggi for finding this purse idea; it is on another person's blog.
I used the pattern provided there and followed her instructions. I cut out the pieces for 6 purses and applied clear tar gel to all the card stock, letting it dry overnight before proceeding. I ran the colored card stock for the purse bodies and the straps through the cuttlebug to get the texture you see in the pictures. I cut a piece of black 12 x 12 card stock in the pattern of the purse for each of these to act as a liner that the colored card stock was glued onto. It was necessary to do this since the piece for the top and back of the purse had to be cut into sections so that it would fit through the cuttlebug. Here is the blog I got the information from http://theresasgottahaveblingblog.blogspot.com her Aug 29, 2010 posting.
On the left the body of the purse is a very light brown and the straps are dark brown. On the right the body of the purse is a medium brown and the straps are light brown.
Here are two more of the purses...
On the left I used rust colored card for the body of the purse and brown for the straps.
On the right I used a beige colored card for the body and dark brown for the straps.
My camera has been acting up... we are in the process of looking for a new one. Besides the camera 'freezing up' on us it also does not show the true colors of the items. When I look at these 2 purses with my eyes the colors seem different that what I am seeing in this picture. They look better in real life!!
And here are the final two purses...
On the right I used a red brick colored card stock for the purse and black for the straps.
On the left I used light grey card stock for the purse and stamped a snake skin over the entire piece with black ink before applying the clear tar gel. The straps were made using black card stock.
I really like how these turned out and am looking forward to filling them with about 5 or 6 handmade cards to give as gifts.
Next time I'm going to make the purse 2 inches wider and I'm going to experiment with something other than clear tar gel.

Completed the August challenge

Here is the collection of items that Bonnie gave us at our August 'shoebox' night. Now, our challenge, or should I call it homework, is to use these items to make something. Jane also brought something for all of us, but it isn't pictured here. It was a small slim gold colored box. You'll see it further on in this post.
I finally got inspired to use these items and create some 'stuff'. Well, I used all of it except for that piece of red and silver foil!!
The red corrugated paper in the upper left is perforated across the middle in a wave pattern.
Look at the background of this card and you'll see the diamond pattern piece that Bonnie provided us with. I layered that on top of a piece of black card stock that is slightly smaller than the grey card I started with. The 2 silver glitzy pieces were taken off another card that a friend of mine received and then saved for me to recycle. I added the black and white diamond pattern ribbon at the top of the card to coordinated with the background piece and add some interest.


It may be a little difficult to see, but this is the blue card with the diamond pattern. I attached a piece of blue vellum on top of the card before also attaching the sizzix architectural corners and the nestability flowers. I stamped the saying onto the blue vellum with india black ink. And I attached a pearl to the center of each flower.


The red corrugated paper that Bonnie gave us reminded me of waves... therefore, I thought of fish!! I embossed the fish with some embossing glitter and after applying the red corrugated paper to the top and bottom of the card I found this blue rick rack ribbon to add. I added some glossy accents in the bubbles above each of the fish.


This is the slim gold box that Jane brought to our August stamp night. The box is very slim and could be used to hold a gift card, cash, or maybe some stamping embellishments for a stamping buddy!!
The rhinestone applique was an item that Jane also gave us at Maggi's Stampin' Up party in September. The label is cut from a nestability die and I taped it onto the box before adhering the rhinestone flower.
I'm glad to finally complete all my challenges from our August stamp night. I'm sure Bonnie or someone will have more for us when we meet in October.

Wednesday, September 15, 2010

Christmas Cards for 2011

My goal is to finish my Christmas cards before the end of October... because I won't have time in November to work on them. It took a while to get my brain into the spirit of Christmas cards. I remembered a 'reverse nestabilities' technique that my friend Maggi showed me. Maggi found the technique on Stamp TV by Gina K. I went to that website and watched the video and was hooked. All but one of my cards shown in this post use that technique. My photos don't show off the dimension of these cards. The top 2 layers are attached to the card front using a foam adhesive to give the look of a shadow box.
In this card I used my 'newest' christmas stamp... and some decorative christmas card stock that I bought last year, but didn't use up. Another goal of mine is to "use" a lot of the "stuff" that I've been hoarding over the years that I've been involved in this crazy hobby of card making and mixed media.
The stamp I used for this card is actually larger than what you see through the layers, but it worked well for this reverse nestability card. I did use some watercolor pencils on the tree and the holly in the lower left corner to add just a touch more color. I used deckle edge nestabilities to cut both layers and the inside layer was edged with a gold krylon pen. A decorative corner punch was used on the outside layer. A piece of printed vellum on the bottom seemed a good addition to spice up the card.
In this card I used the same stamp used above. And, I used the same types of card stock, but I reversed the colors; in this one the card base is green and the inside layer is red. Also, I used a classic rectangle nestability on the inside layer rather than the deckle edge rectangle.


Here is that stamp again with different card stock than used in the previous cards I made. I still have more Christmas papers in my stash!!! I guess I'll be using them for my next years cards too.


This card is another using the 'reverse nestability' technique. I really like the look of this technique... can you tell.. I've made lots of Christmas cards using it! And once again I focused on using some things I've had in my stash for some time now..... the white snowmen trim at the bottom of the card and the snowman in the center of the circle. That snowman in the center is ribbon!!! It is a wide ribbon with about 3 different types of snow men printed on the ribbon separated by red and white checks. So I just cut off one of the squares, one snowman, for each card I made. The red card front was run through the cuttlebug with the snowflake embossing folder. After I did that I used my glitter gel pen to outline the snowflakes; it gave the card just the glitz it needed. I used the scalloped circle nestability for the red and black card stock.
I have quite a few nestability "left overs"... like the black scalloped circles I used on this card. But first, I ran my red card front through the cuttlebug with the snowflakes embossing folder and then I ran a strip of clear vellum through with a snowflake border. I used a glitter gel pen to outline the snowflakes on the red card and to apply dots in the scallops of the black circles. The cute snowmen faces were stamped with black ink and colored with markers before running them through the cuttlebug with the nestabilities scalloped circle.. just one size smaller than I used on the black card stock.

Friday, September 3, 2010

PHEW!!!! Done with 2011 calendars


Yup, MORE calendars, but now I'm done... I think!!
These are in the style of easel cards. I really liked the calendars I had made earlier using the cuttlebug embossing folder - numbers... so, I came up with another design idea so that I could use it again. The numbers adhered to the front panel of the calendar were cut from a cuttlebug alphabet die set. The saying on the base of the card was typed and then cut out using a nestabilities die. I found those large fancy jeweled brads at the Oriental Trading Company website.


2011 calendars AGAIN!

Here is another design in which I used the easel card style. This idea for a calendar came to me by way of the saying...'Take time to smell the flowers'. I remembered having this sparkly flowery paper and that's all it took to come up with this design. The flowers were cut from nestabilities dies and the butterflies from a cuttlebug die and embossing folders.


More 2011 calendars

I made a couple of calendars like this one. I have lots of decorative paper in various sizes.... it's about time I start using it and not worry about 'using it up'. The letters were created using a cuttlebug alphabet die set and then I ran them through a xyron sticker maker to apply the adhesive.

More calendars for 2011

I made several flip calendars where I created a page for each month of the year and then bound the 12 pages together using my Bind-It-All. I had purchased a pack of scrapbook paper that contained one 12 x 12" sheet for each month. I also purchased a set of ribbons that were printed with the various months. Using that paper, the ribbon, some cuttlebug embossing folders, and other embellishments I may have had laying around, I managed to make 8 different calendars. Here are pages representing each of the months.


Wednesday, August 25, 2010

Calendars for 2011

It is only August, but some things have to be completed ... like these calendar easel cards... and Christmas cards (oh boy, I need to start on those!).
I've made a bunch of calendars so far with various designs. I have more to make, but here is a look at the easel card design with a theme of 'time'.


Here is what this easel calendar looks like when opened. I made 4 calendars with this design and the front panels are the same, but the base for each of the 4 are different. This base contains a piece I cut using a nestabilities die.


My Stampers Anonymous 'T' stamp seemed so appropriate for calendars so I used it again with a different design. I also have the cuttlebug embossing folder 'numbers' so I used that together with the stamp to create these easel card calendars.


Here's one of the previously shown easel calendars opened and standing up. Each of the calendars contains a different quote. I typed the quotes and printed them from the computer. The quote was layered onto the piece of scrapbook paper that I attached to the base of the card. I attached a piece of ribbon across the base so that the front of the easel card could be propped up against it.

August stamp get together

Our August get together was held at my house. Unfortunately, 2 of the ladies were unable to attend. Liz, Bonnie's friend, had another commitment, and Ashley had to take her dog to the vet for an ear infection. We missed them, but it took us all night to do the 3 cards you see here. We would have done 4 cards, but when Maggi opened up her bag she found that her stamp scrubber had leaked and ruined the papers for her shoe box card!!!
This is my card. There were several options available with regard to the images. In the largest square you could stamp the canoe seen here, or a pontoon boat, or a kayaker. Instead of the tree, you could stamp an eagle. Rather than the loon you could stamp 2 people in a canoe. And instead of the pine cone you could have stamped a man fishing in a boat.
This is Jane's shoe box card... isn't it Great!! This is the second time I've used the Martha Steward punch we used on this card and I think I am going to buy it soon. We used double sided scrapbook paper - flowers on one side and stripes on the other.


This is Bonnie's shoe box card...
She had 2 versions: a night time version and a day time version; I chose the night time version. There were two interesting things we learned with this card. The blue background, behind the stamped trees, was created by swiping 2 colors of distress inks across the paper. We just applied the ink directly from the ink pads. The second thing we learned was how to make the decorative pin. Love the card!
This is a collection of items that Bonnie brought for each of us... it is for our monthly challenge. Her friend, Sally, sent her the items and now it is up to us to see what we can create with them. Maybe I should leave this out on the table and stare at it for a while to see if I come up with any ideas.


And Jane brought a bunch of these small boxes, so each of us took a few. These would make great gift card holders. I'll work on my challenge first and then see what I can do with these.
Next month we are meeting at Maggi's for a Stampin Up party.... so we don't need to make a shoe box card for the group.

Sunday, August 1, 2010

The Paper Cut..... card classes

On a Friday afternoon in early July, my friend, Mary, and I took a trip to Appleton, WI. We had signed up for 2 card classes that coincided with a warehouse sale at The Paper Cut. Our first class was 'shaker cards'. The classes were given by Sarah and what a fantastic job she did. All the elements and pieces needed for each card were provided in individual envelopes with other supplies, such as stamps, ink, ribbon, etc located on the tables. She instructed us in the basics of how to use the 'shake it' pouches, an Impression Obsession product, and away we went. Mary and I ran out of time and didn't finish the 9th card for this class. It was like a stamping marathon, but we are so happy with the results. Of course we had to buy some of the shake it pouches and window cards at the warehouse sale that started after our second stamp class. The Paper Cut is known for their precut cards and card panels that work perfectly with these shake it pouches.
And here are the other 4 cards we finished in class. These are so cool!!!! And they are so much easier to create using the 'shake-it' inserts.
One of the other tools we used for many of these cards was also an Impression Obsession product ... cover-a-card stamps and the mega mount. These are large background type cling stamps that attach to an acrylic curved mount with a handle. After inking the stamp, you apply the ink to the card by 'rocking' the mega mount across the card front. All 4 of these cards have backgrounds created using these tools. Here's a link to view the stamps and the mount.
http://impression-obsession.com/Merchant2/merchant.mvc?
The second class that Mary and I took that day was "Making cards using acetate". We were given 10 cards to create with all the pieces for each of the cards provided in individual envelopes. Before we started Sarah explained, and handed out typed instructions, on how to print pictures onto acetate using your computer and printer. For this class she had provided the pieces of printed acetate so that we could concentrate on creating the cards. We had just enough time in the class to finish the cards we were given.
Here are 5 of the 10 cards. The pictures on the acetate may look a bit fuzzy and that is because when I laid the cards on the table the front panel of the card didn't remain flat against the back of the card resulting in a slight distortion of the image that is printed onto the acetate.

Here are 4 more of the acetate cards. There was a 10th card, but I had already mailed it to our neighbors in celebration of the birth of their baby girl.
Mary and I had a great time, but were exhausted from the 2 classes we took. After this second class it was time for the warehouse sale... and what a sale it was!!! The deals were fabulous! We hope to go again next year.
Check out The Paper Cut, and if you live near Appleton, WI you just have to attend next year's classes and warehouse sale.
http://www.thepapercut.com/

Friday, April 23, 2010

Artiscape 2010 - A Background Menagerie

Sunday (April 17) was my last class at Artiscape. It was called A Background Menagerie and was taught by Kari McKnight-Holbrook. She is a sweet person and a great instructor. She had set up work stations for the various backgrounds (27 plus). She provided written instructions on an index card and samples of each background at the work stations. I did not finish them all; I didn't even get all of them written down, but here are most of those that I did complete.
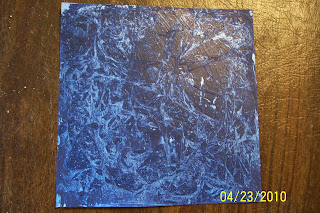
Plastic Wrap (shown above)
- Paint entire page with one color of acrylic paint and let dry
- Use a second color of acrylic paint, either lighter or darker, and cover the entire page again
- Quickly cover the page with a piece of plastic wrap and crinkle it up throughout the page
- Let dry and then remove the plastic wrap
I really like the outcome and would do this technique again.
Inky Marbles
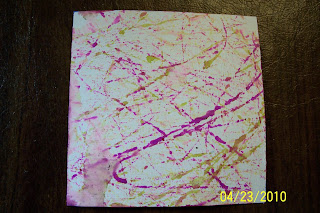
- Secure the page to the bottom of a container using small pieces of tape in the 4 corners. In class we used a tupperware container with a lid. Depending on how wild you get when you roll the marbles you could use an uncovered container.
- Place several, we used about 8 to 10, marbles in the container. Place a couple of drops of 1 or 2 colors of alcohol ink onto the marbles.
- Close the lid of the container and shake the container so the marbles roll across the paper.
- Open the container and place 1 to 2 drops of alcohol (or blending solution) onto the marbles.
- Close the lid and shake the container again.
Inky Marbles
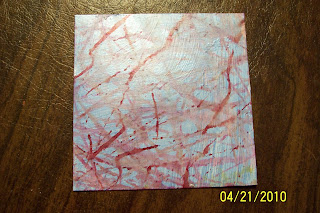
This inky marbles was created the same as described above except that before I performed the inky marbles technique I painted the page with acrylic paint.
This was one of my favorite techniques also and I can see myself doing this again.
If you are doing multiple pages you want to make sure that the inside of the container is dry before you start on your next page. You can wipe it out with a paper towel.

Spinner
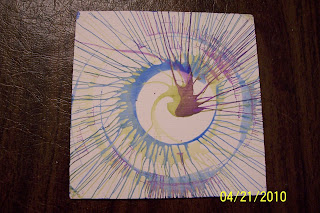
For this technique we used a spinner. It can be found in the children's art section. We found it at a Hobby Lobby under the manufacturer's name of Creative Kids and the cost was $15.
- Affix page onto the spin plate using small pieces of masking tape in the corners. Make sure it sticks or the page will fly off.
- Mix paint and water to a consistency that is a watery drip so that you can use an eye dropper.
- Turn on spinner and using the eye dropper, drip the paint onto the paper.
You can drop the paint anywhere on the paper; it does not have to be placed in the center of the page. Use multiple colors and work from light to dark. Everyone enjoyed this technique... I may have to buy a spinner!!!
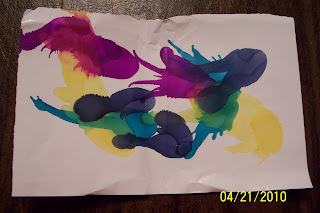
Alcohol Ink Spatter
- Place a couple of drops of alcohol ink onto glossy paper. It is best to work with one color at a time.
- Immediately spray the ink using a can of compressed air. The product we used was called 'dust off'.
- Add additional colors as desired.

This is a fun technique. It was my first time using a can of air and I learned that you should not shake it and only spray holding the can upright or the can will freeze up and not work until it warms up again.
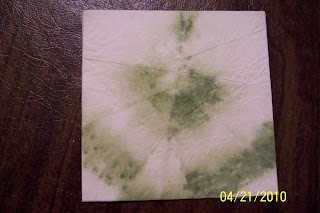
Coffee Filter
- Using an ordinary coffee filter, fold it up into whatever shape or size you wish
- Apply paint to various areas of the coffee filter. In this example I dipped the coffee filter into a cup of water that was used to clean brushes and then I applied a darker green in a stripped pattern.
- Let the coffee filter dry and then adhere to card using gel medium. The excess filter that hangs over the edge of the page can be cut off or folded over to cover the back of the page.
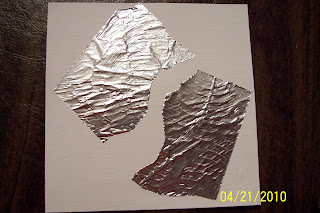
Flu Tape
- Place a piece of flu tape (also called metal tape) shiny side down on a texture plate
- Rub with a popsicle stick or stylus
- Peel off back of tape and position onto card. Once placed down this tape is permanent.

I found this tape at a local hardware store near the plumbing supplies; it comes in a fairly large roll. I would think you could run this through embossing machines, like a cuttlebug. Just remember to leave the backing on the tape until you are ready to adhere to the page. You can now paint the tape or use alcohol inks on it.
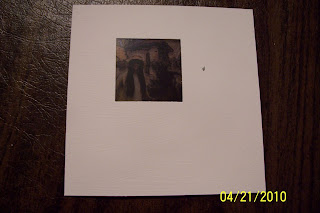
Windows
- Hold 2 pages together making sure the pages are lined up and punch through both. I used a square punch.
- Insert magazine photo, graphic, colored paper, or transparency between pages using pieces of scotch tape to hold in place. We used printed transparencies.
- Adhere pages together using tape, gel medium, or whatever method you wish
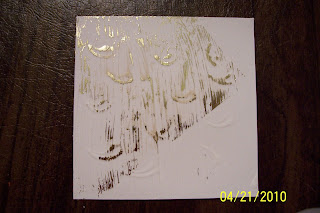
Foil
- Start with a page that contains texture/raised areas. We created raised areas by applying gesso more heavily in some areas and manipulating with our paint brush handle.
- Apply gel medium over entire page and let dry
- Place foil shiny side up on part or all of page
- Press onto foil with a heating iron
- Pull off foil
I like this technique, but I think I need more practice.
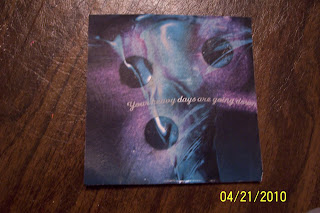
Magazine Pages and Rubbing Compound
- Select a colorful magazine page, adhere to card with gel medium, let dry
- Take labels (I used round ones) and rub them on your clothing so that they are less sticky
- Place labels on colorful areas of page
- Take a small piece (cottonball size) of Neverdull and rub on and around the labels or anywhere else on the page
- Pull off labels
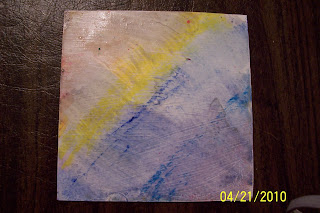

Portfolio Oil Pastels
- Color card heavily with Portfolio Oil Pastels
- Using a brush and moving from light to dark, apply future floor wax

I think this works best if you apply the floor wax very sparingly on the paper otherwise it puddles up. In class it also became a problem since everyone was using the same brush causing the colors to muddy.
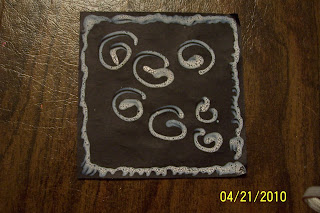
Bleach Pens
- Use dark card stock
- You can rough up the edges of the card stock with an emery board if you wish
- Write/draw onto the card stock with the bleach pen
- Set aside to dry

I'm not sure I care for this one. After this dried some of the white that you see was crumbling off the paper. I don't know if I applied to much of the bleach from the pen or if this is how it should be.
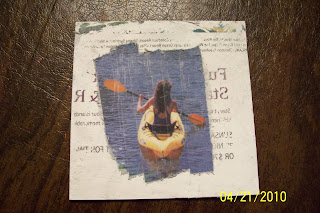
Scotch Tape Doubles
- Choose a magazine page with interest on both sides of the page
- Apply gel medium to magazine page and smooth it onto the card making sure to have focal image facing up
- Place strips of scotch tape across parts of image you want to preserve
- Let gel medium dry and then rub off pulp using wet fingers; spritz the page with water if needed

I think that clear packing tape would be better as it is wider. I like how the print from the other side of this magazine page stays on the card after rubbing off the pulp.
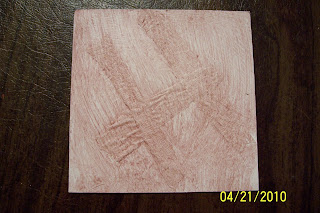
Masking Tape
- Apply strips of masking tape over the page
- Gesso over the tape
- When dry, apply glaze over the page
- Rub and buff over glazed page

I think I should have used more masking tape to create more texture.... and I think I forgot to rub and buff over the page once it dried. The class was getting a little hectic at that point.
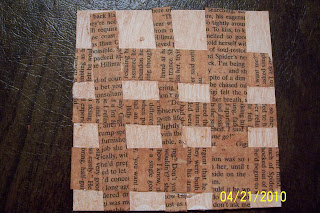
Woven Text
- Take a page with text and cut or tear into strips
- Apply gel medium over the entire page
- Lay the strips of text down making sure to weave them
- Touch up with gel medium where necessary to adhere the text pieces to the page
* Once dry I painted over the entire page with a tinted glaze
I think this would look better if I had ripped the text paper instead of cutting it, and I think that a darker paint would also be better.